Facebook-f X-twitter
EncodeByte
Need Help!
  • How-To
    How-ToShow More
    How To Redirect Old Website To New Domain Without Losing SEO | 301 Domain Redirect
    By
    Franchbabu
    How to Fix the “Windows Cannot Be Installed to This Disk” Error
    By
    EncodeMore
    How to Check Your Laptop’s Battery Health: A Step-by-Step Guide
    By
    EncodeMore
    How to Become a Freelancer in 2025: A Comprehensive Guide.
    By
    EncodeMore
    How to Activate Windows Legally and For Free (100% Working)
    By
    EncodeMore
  • Web Development & Coding
    Web Development & CodingShow More
    How to Become a Freelancer in 2025: A Comprehensive Guide.
    By
    EncodeMore
    Top In-Demand Freelancer Niches for 2025 – Fast Growth Ahead!
    By
    EncodeMore
    🚀 10 Reasons Why Hostinger Is the Best Web Hosting Platform for Speed, Security & Affordability
    By
    Franchbabu
    How to Add “Made with ❤️” to Your WordPress Footer (No Plugin Needed)
    By
    EncodeMore
    WordPress Redirect After Login: How to Set It Up
    By
    EncodeMore
  • Code Snippets & Scripts
    Code Snippets & ScriptsShow More
    How to Hide a Class in WordPress (Easy CSS & Admin Tips)
    By
    EncodeMore
  • Website Design & UX
    Website Design & UXShow More
    10 Web Design Mistakes That Are Killing Your User Experience (and How to Fix Them)
    By
    Franchbabu
  • Make Money Online
    Make Money OnlineShow More
    How to Become a Freelancer in 2025: A Comprehensive Guide.
    By
    EncodeMore
    Top In-Demand Freelancer Niches for 2025 – Fast Growth Ahead!
    By
    EncodeMore
    Website related skillsets that you shoud have
    By
    EncodeMore
    Top Sites Like Fiverr: The Best Fiverr Alternatives for Freelancers
    By
    Franchbabu
    Best Telegram Channels For Free Paid Courses
    By
    Franchbabu
  • 🤩 Trending:
  • How-To Guides
  • WordPress & Website Development
  • Web Development & Coding
  • Windows & Software Fixes
  • Tech Tips, Tools & Tutorials
  • Computer Tips & Tricks
Font ResizerAa
EncodeByteEncodeByte
Search
  • How-To
  • Web Development & Coding
  • Code Snippets & Scripts
  • Website Design & UX
  • Make Money Online
Follow US
Made by ThemeRuby using the Foxiz theme. Powered by WordPress
How-To GuidesWordPress & Website Development

How to Create a Contact Form in WordPress (Step by Step)

Last updated: April 14, 2023 2:12 pm
By
Franchbabu
Share

A contact form is required for all websites on the internet. By filling out a form on your website, it enables website visitors to get in touch with you swiftly.

By default, WordPress does not come with a built-in contact form.

WPForms can help with this. The best WordPress contact form plugin, it makes it simple to design stunning contact forms for your website.

Step 1. Install WPForms Plugin in WordPress

You can install this plugin on your site by logging into your WordPress dashboard and going to Plugins » Add New.

Then, in the search field, type ‘WPForms’, and click on the ‘Install Now’ button.

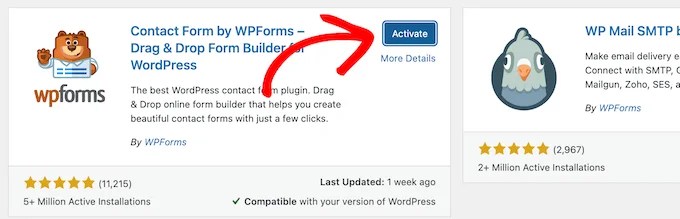
This will automatically install the plugin on your site.

After that, you must activate the plugin by clicking the ‘Activate’ button.

Step 2. Create a Contact Form in WordPress

Now that you have activated WPForms, you are ready to create a contact form in WordPress.

To do this, navigate to WPForms » All Forms in your WordPress admin panel. Then, click the ‘Add New’ button.

For the sake of this example, we’ll choose the “Basic Contact Form” template. The Name, Email, and Message boxes will be added automatically.

To edit a form field, simply click on it.

When you click on a form field, it opens a ‘Field Options’ window on the left where you may make adjustments.

You may also adjust the order of the fields by dragging and dropping them.

If you want to add a new field, simply choose one from the list on the left sidebar.

You may drag it to your form or click on it, and it will be inserted automatically.

Be sure to click the “Save” button once you’ve finished modifying your form.

Step 3. WordPress Form Notification and Confirmation Configuration

You must carefully customize the form notification and form confirmation options after creating your contact form.

When a user submits a form on your website, a confirmation page appears. This may be whatever you’d like, from a straightforward thank-you to a website with downloadable Files.

The email you receive after someone submits the contact form on your WordPress blog is known as a form notification.

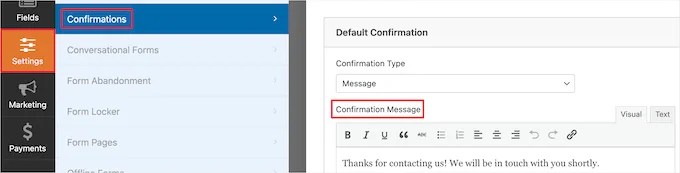
On the form builder, choose the “Settings” tab, followed by the “Confirmations” tab, to edit the confirmation message.

A default thank you message is already present.

Nevertheless, if you’d like, you may change this in the “Confirmation Message” box.

If you wish to redirect users after successful form submission instead of presenting a message, pick ‘Go to URL’ from the ‘Confirmation Type’ drop down.Finally, enter the URL to which you wish to redirect people.

Following that, you may double-check the form notification settings. Simply go to the same ‘Settings’ menu and select the ‘Notifications’ option.

WPForms’ biggest feature is that its default settings are perfect for novices. When you browse to the notification settings, all fields are dynamically pre-filled.

By default, alerts are delivered to the admin email address that you specified when you started your site.

If you wish to send it to a different email address, you can do so. If you wish to send the notice to numerous email addresses, simply separate each one with a comma.

The ‘Email Subject Line’ field is pre-populated with the name of your form. The ‘From Name’ area is pre-filled with your user’s name.

If you make changes here, remember to click the ‘Save’ button.

Step 4: Adding WordPress Contact Form in a Page

It’s time to add your WordPress contact form to a page now that you have finished setting it.

You may either create a new page in WordPress or add it to an existing contact page.

Just select Pages » Add New and give your page a name to create a new contact form page.WPForms also comes with a WordPress contact form shortcode. You can use this by visiting WPForms » All Forms and then copy the shortcode next to your form.

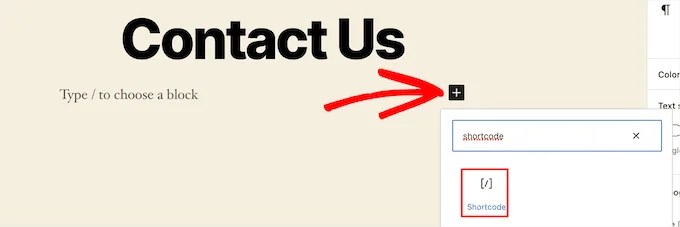
So, all you have to do is enter the page where you want to add it, click the “Plus” add block button, and then look for “Shortcode” in the list of available add-ons.

Next choose the “Shortcode” section.

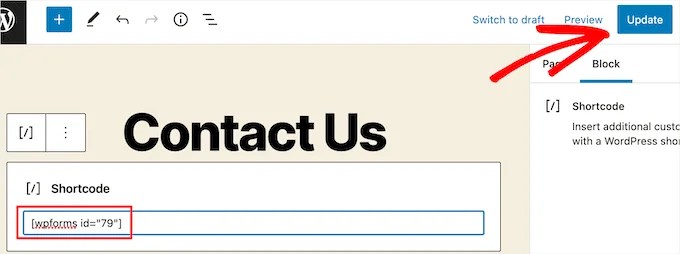
Copy the shortcode above, and then paste it into the box.

As shown above, your contact form will then be live on your website when you click “Update” or “Publish.”
Shortcodes should be pasted and saved.

Here’s what the form looked like on a sample WordPress contact page:

If you liked this article, then please Like, comment and share.

Thank you.

Share This Article
Facebook Whatsapp Whatsapp LinkedIn
Leave a Comment

Leave a Reply Cancel reply

Your email address will not be published. Required fields are marked *

Popular Categories

Themes & Customization

1 Article

Troubleshooting & Fixes

1 Article

WordPress Tips & Tricks

6 Articles

WordPress Tutorials

5 Articles

Must Read

WordPress & Website DevelopmentHow-To Guides

How to Create a Private/Password Protected Post or Page in WordPress

How-To GuidesSEO Tips & StrategiesWordPress Tutorials

How To Redirect Old Website To New Domain Without Losing SEO | 301 Domain Redirect

Computer Tips & TricksHow-To Guides

How to Repair a Bad Hard Disk (Hard Disk Low Level Format)

How-To GuidesTech Tips, Tools & Tutorials

How to Remove URLs From Google Search

  • I need help with …

Starting a Blog

WordPress SEO

WordPress Performance

WordPress Errors

WordPress Security

Got A Question?

Need Expert Help?
Let CodeXcool power up your website with
custom WordPress design, speed optimization, and SEO!
🚀 Get Started

You Might also Like

Plugins & ToolsSEO Tips & StrategiesWeb Tools

The Best 18 SEO Tools That SEO Experts Actually Use (In 2024)

WordPress & Website DevelopmentHow-To Guides

How to Fix “Error Establishing a Database Connection” in WordPress [STEP BY STEP]☑️

How To Delete Your Google Search History
How-To Guides

How To Delete Your Google Search History

How-To GuidesCode Snippets & ScriptsWordPress Tips & Tricks

How to Hide a Class in WordPress (Easy CSS & Admin Tips)

EncodeByte

© 2025 EncodeByte – Discover expert tech tutorials, coding guides, troubleshooting solutions, and free tools. Simplify technology, build smarter, and learn faster with us.

About Us / Privacy Policy / Contact Us

Latest News

  • Coming Soon
  • Coming Soon
  • Coming Soon
  • Coming Soon

Services

  • Coming Soon
  • Coming Soon
  • Coming Soon
  • Coming Soon

Looking for custom web development or maintenance?

Check out our parent team at [CodeXcool.com] 🚀
— Let's build together!
Request a Quote
Welcome Back!

Sign in to your account

Username or Email Address
Password

Lost your password?