When viewing your WordPress website, do you see the message “Your PHP installation appears to be missing the MySQL extension which is required by WordPress”? Don’t worry; we’ll guide you through the various diagnostics in this post to help you fix the PHP installation issue.
Why Does the Error Missing MySQL Extension Occur?
Basically, this is a MySQL issue that can happen if:
- You’re using an out-of-date plugin or version of WordPress.
- You’re running an outdated version of PHP.
- You have improperly setup PHP extensions.
- There isn’t a MySQL extension installed.
MySQL Extension Error Solution
The aforementioned a number of causes might result in the PHP installation problem. However, by taking the following actions, it can be quickly diagnosed:
There are a number of causes listed above for the PHP installation issue. However, it may be quickly identified by doing the following actions:
1: Update Your WordPress & Plugins:
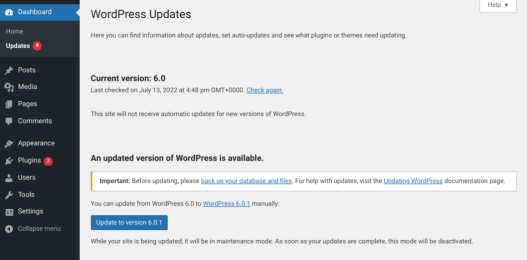
Update the WordPress installation to the most recent version as the first step in diagnosing the MySQL extension issue. Follow the steps below to verify your WordPress version and upgrade it to the most recent version:
Open your WordPress dashboard by first logging in.
When you are logged in, move your mouse to the Dashboard tab and select the Updates drop-down.
Whether the Plugins update or the WordPress update. You may quickly upgrade your WordPress version and plugins to the most recent versions by seeing both under the Updates section.

Check the PHP version your website is using after updating WordPress and any plugins to the most recent versions. By doing the steps below, you may quickly determine what version of PHP is currently running on your WordPress website:
2: Check Your Website’s PHP Version:
The procedures listed below will help you determine what version of PHP you’re using:
Once you’re sure that your WordPress core is up to date, the next step is to check which version of PHP your server is using. There are a couple of ways to go about this.
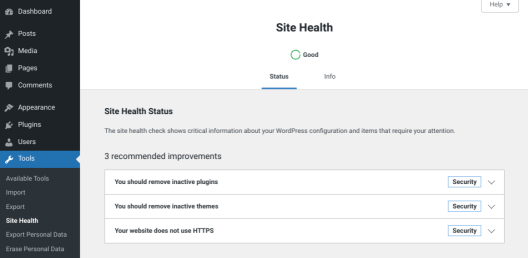
The easiest option is to navigate to Tools → Site Health from your WordPress dashboard.

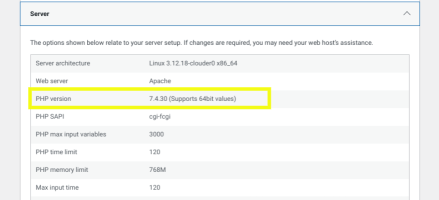
Next, you can select the Info tab, then scroll down and expand the Server panel. Under this section, you can locate the PHP version you’re currently running.

If you’re not able to access your WordPress admin, you can check your PHP version by Log in to your cPanel account.
Make a new file by going to File Manager >> Public html in your root directory.

Name the file as phpinfo.php and hit the Create New File button

Note: The phpinfo file must be present inside the root directory of your WordPress site.
Once created, open the file by clicking on the Edit button.

Add the below command inside the phpinfo file and hit the Save Changes button.
<?php
phpinfo();
?>
Once you save the file, hit the phpinfo.php file from outside to see your current PHP version. For instance, if your WordPress installation is inside www.YourDomain.com/wp then type www.YourDomain.com/wp/phpinfo.php in the search bar. Likewise, if your website is located inside the root directory, simply type www.YourWebsite.com/phpinfo.php and hit the enter button.
Note: Do not forget to replace YourWebsite.com with your own website URL.
As soon as you hit the file from outside, you’ll be able to see almost every PHP information such as PHP Version, Build Date, Server API, Etc.

That is how you may determine the current PHP version of your website. If the PHP version is more than 7, your WordPress website’s software must be updated. Aside from that, if your website’s PHP version is 5.X, you may be lacking the MySQL extension, which should be corrected immediately.
3. Ensure the MySQL extension is installed
If your WordPress version is up to date, you should also ensure that the MySQL extension is installed and activated. It’s conceivable that your operating system (OS) didn’t contain the extension by default, in which case you’ll have to install it manually.
Return to the phpinfo.php file you produced in the previous step to see if it’s installed. After that, go to the mysqli or mysql section. If the MySQL extension is installed, the version number will be shown next to the Client API column.

But, if this field is blank or not visible at all, it means that the MySQL extension is not installed. The process for installation will depend on your host. You can refer to the PHP installation guide for details.
If your provider uses cPanel, you can enable the extension by navigating to Software from your cPanel dashboard, then choosing Select PHP Version.

Here, select the most recent version of PHP, then click on the boxes for mysqli and mysqlnd. Save your changes, then revisit your site to see if you’re still seeing the error message.
You might also speak with your web host if you’re unsure about installing the MySQL extension on your own. Always feel free to ask them to finish this procedure on your behalf.
4: Verify the installed MySQL extension
You may safely validate that something else is causing the problem once you know your WordPress version is up to date and the MySQL plugin is installed. Another reason you may be receiving the error message is because the extension is not properly setup.
Misconfiguration can occur due to a variety of factors, including improper file paths or the use of a php.ini file meant for a different type of server. For example, you may be running a Windows server on a Linux server.
To verify that your PHP extension is configured properly, navigate back to your phpinfo.php file. Then, locate the Loaded Configuration File item.

This is where you can find the file path value. Note the file path listed here, then look for the extension_dir row.

The file path listed here should match what is listed for the Loaded Configuration File. If not, the next step is to edit your php.ini file to correct it. When you’re done, revisit your site to make sure the error is resolved.
Methods for avoiding the MySQL extension problem in WordPress.
You’ve now learnt how to solve the MySQL extension problem in WordPress. But, there are actions you may do to avoid this happening in the future.
It’s also critical that you maintain your WordPress software up to date. Not only will this help eliminate issues like the MySQL extension issue, but it will also improve the security and speed of your site.
Lastly, select a WordPress site server that uses current PHP versions. When providers handle these changes automatically, you no longer need to manage them manually. They may also assist in streamlining server configuration to ensure that best practices are followed.
As a result, the chances of encountering PHP-related issues are reduced. There are several high-quality and trustworthy WordPress hosting to select from.
As previously indicated, there are four steps you may take to resolve this problem in WordPress:
- Update your WordPress software and plugins.
- Check your PHP version and update it, if necessary.
- Ensure that the MySQL extension is installed.
- Verify that the PHP extension is properly configured.
It is critical to back up your site in real time to help prevent WordPress difficulties in the future and to make debugging and fixing any issues easier.


