Blogger is a free Google publication platform primarily used for creating blogs. Blogs are usually hosted by Google on the blogspot.com subdomain (e.g. www.blog.blogspot.com). However, they can also be hosted on a registered custom domain (such as www.example.com).
In this tutorial, you’ll learn How To Set Up a Custom Domain in Blogger.
What you’ll need
Before you begin this guide you’ll need the following:
- A Blogger account.
- A functional domain.
- Access to a DNS editor (your hosting provider/domain registrar can also be contacted for assistance).
Step 1. Adding Two CNAME Records
Setting up the CNAME records is the initial process, which you may accomplish by doing the following steps:
- Go to Settings → Custom domain on your blog to locate the necessary CNAME records.

2. After entering your domain name on the settings screen, click Save.

Keep in mind that the www subdomain needs to be included with the domain name.
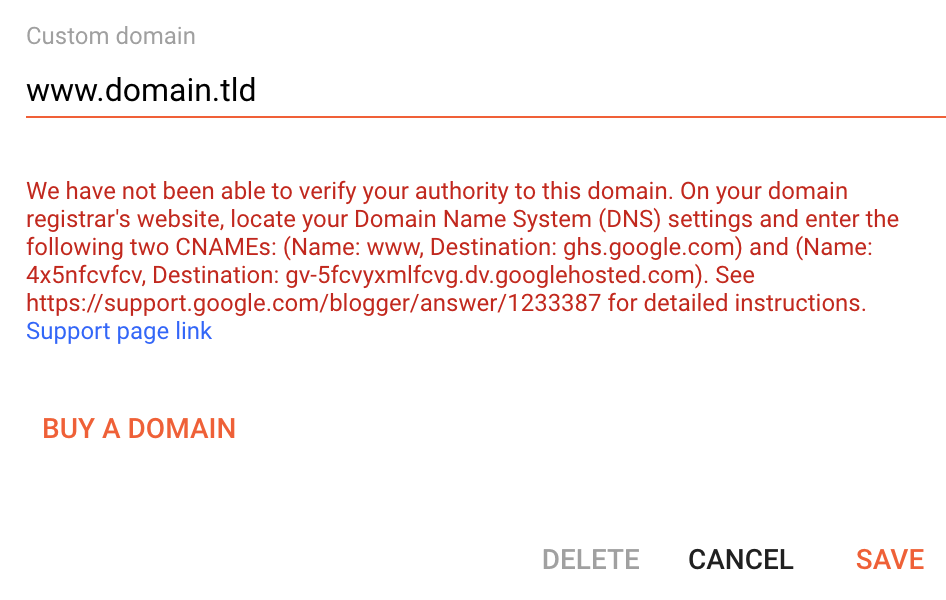
- Following that, a screen with the two necessary CNAME records will show up.

4. Create these records with any DNS editor. To get help, contact your hosting provider or domain registrar. First, update the existing CNAME www record.

5. Add the new CNAME record after that.

Save the modifications to your Blogger account after adding both CNAME records, and give the DNS settings up to a day to take effect.
Step 2 (optional). Adding Four A Records or Redirecting to the WWW
The addition of four A records is an optional step. By doing this, you can load your website from both URLs and link to its www and non-www address variants.
Visitors that omit the “www” portion of the domain will, depending on your existing A record, either see an error page or a different website if you skip this step.
For these IP addresses, make A records to prevent that:
To avoid that, create A records for these IP addresses:
- 216.239.32.21
- 216.239.34.21
- 216.239.36.21
- 216.239.38.21

It could take up to 24 hours for the A records to properly propagate after adding them. Then, people will be able to access your blog via both the domain.tld and www.domain.tld URLs.
As an alternative, you may reroute readers from your blog’s non-www version to its www version. In this manner, there will be no need to set the A records.
Once your custom domain settings are configured, you can create redirects. Toggle the Redirect domain toggle by opening the Settings section.

Enable HTTPS for the custom domain
Secure connection to your blog is provided by HTTPS. It is also essential for SEO and will increase user trust.

Your website must point to just one HTTPS URL. In the redirect domain settings for the fallback subdomain:
- Allow the domain to be redirected from its unmodified state to its www version.
- Activate an HTTPS-secured server and make HTTPS available. Please be aware that this will require a few minutes, during which the website won’t be accessible or an error notice will appear.
- The website will reload using HTTPS after some time. Activate HTTPS redirect to steer clear of SEO collisions.
Final Words
How to configure a custom domain name for the Blogger blog was covered in this post. as well as setting Blogger’s custom domain name to HTTPS.
Please feel free to ask any questions in the section below if you have any doubts, inquiries, or criticism.


